Accessing Addigy's Public Software pkgs
Once Addigy has released a public software item, you can point your scripts at their .pkg installers, saving yourself the time and trouble of uploading them yourself.


Managing multiple Addigy instances? You may find yourself in need of creating your own custom software installers for items that are in Addigy's public software library. Maybe you need to add pgrep checks to Office so it won't install while a user has an app open, rendering Office apps unusable. Or maybe you want to make a deployer, that only runs if the condition script confirms the app isn't installed yet.
When this happens, you may find yourself having to upload your own copy of the Office installer, or Chrome, multiple times for each of your instances. Well, turns out there's a better way - once Addigy has released a public software item, you can point your scripts at their .pkg installers, saving yourself the time and trouble of uploading them yourself.
SUMMARY
- Add the public software item to an empty policy to get it to appear in GoLive
- Run the public software item on a Mac
- Click the details button to reveal the installation instructions. Focus on the very top of the details, which we break into three parts:
- Part 1 - building directories
- Part 2 - download
- Part 3 - install
- Copy and customize these instructions into your own custom software
- Custom software you create using Public Software .pkgs will work in any Addigy instance
1– Get your curl
To begin, you'll need to find the public software installer you'd like to use and successfully push it to a device via GoLive. Remember, you need to scope a piece of custom software to a policy at least once for it to show up in GoLive for deployment, so add and remove it to an empty policy to make it visible without interrupting any of your users. For today, I'll be using Mozilla Firefox 101.0.1. Once you've completed the installation, click the Details button on the right of the software item to see the successful output. No matter what the software item is, it'll always start with the same kind of output:
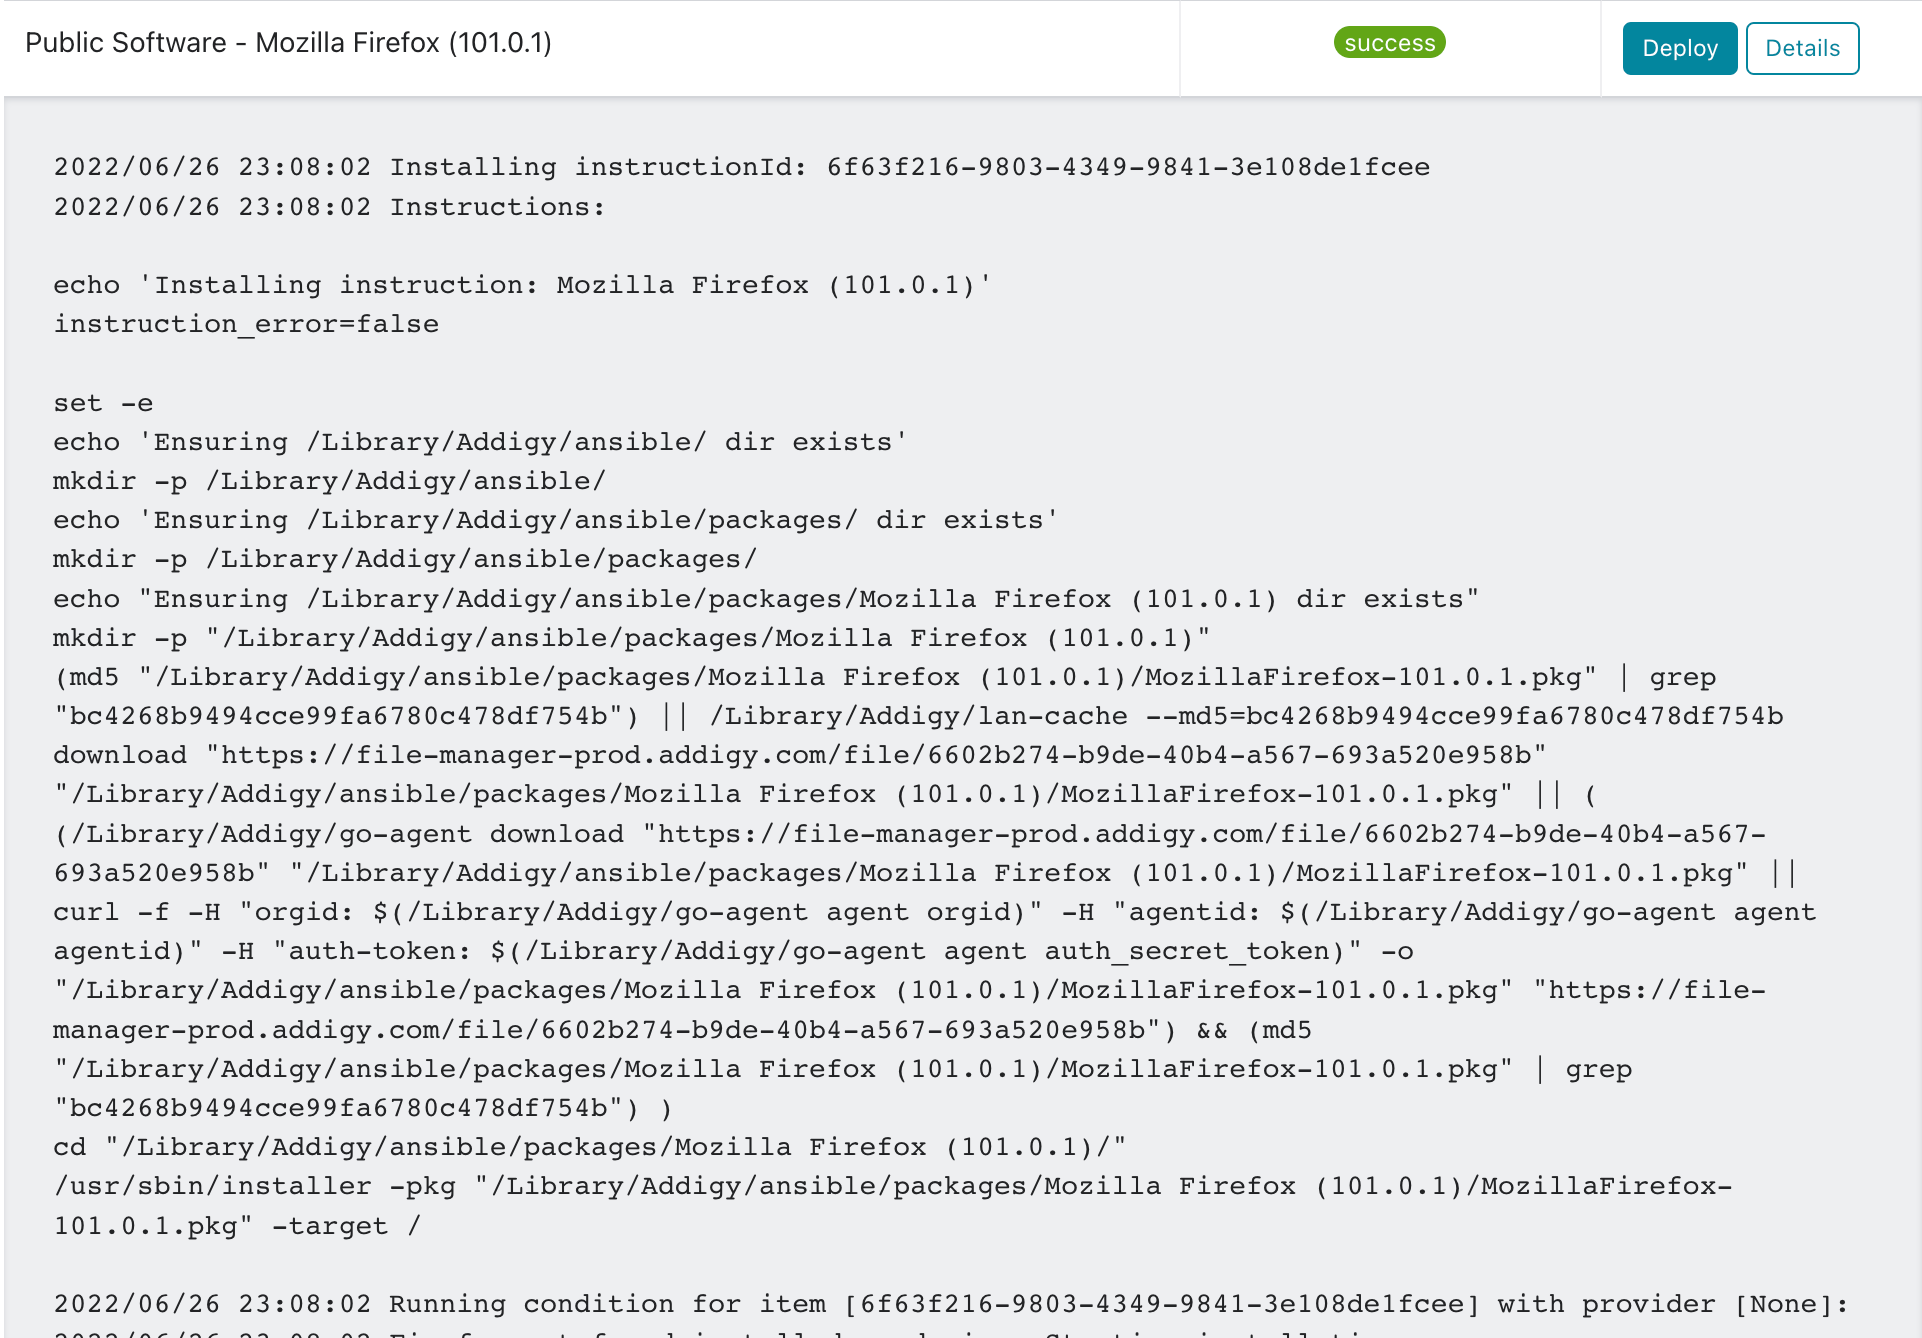
We're interested in this section, starting with the line following the "Instructions:" call and before the "Running condition for item" line. In between is this content:
set -e
echo 'Ensuring /Library/Addigy/ansible/ dir exists'
mkdir -p /Library/Addigy/ansible/
echo 'Ensuring /Library/Addigy/ansible/packages/ dir exists'
mkdir -p /Library/Addigy/ansible/packages/
echo "Ensuring /Library/Addigy/ansible/packages/Mozilla Firefox (101.0.1) dir exists"
mkdir -p "/Library/Addigy/ansible/packages/Mozilla Firefox (101.0.1)"
(md5 "/Library/Addigy/ansible/packages/Mozilla Firefox (101.0.1)/MozillaFirefox-101.0.1.pkg" | grep "bc4268b9494cce99fa6780c478df754b") || /Library/Addigy/lan-cache --md5=bc4268b9494cce99fa6780c478df754b download "https://file-manager-prod.addigy.com/file/6602b274-b9de-40b4-a567-693a520e958b" "/Library/Addigy/ansible/packages/Mozilla Firefox (101.0.1)/MozillaFirefox-101.0.1.pkg" || ( (/Library/Addigy/go-agent download "https://file-manager-prod.addigy.com/file/6602b274-b9de-40b4-a567-693a520e958b" "/Library/Addigy/ansible/packages/Mozilla Firefox (101.0.1)/MozillaFirefox-101.0.1.pkg" || curl -f -H "orgid: $(/Library/Addigy/go-agent agent orgid)" -H "agentid: $(/Library/Addigy/go-agent agent agentid)" -H "auth-token: $(/Library/Addigy/go-agent agent auth_secret_token)" -o "/Library/Addigy/ansible/packages/Mozilla Firefox (101.0.1)/MozillaFirefox-101.0.1.pkg" "https://file-manager-prod.addigy.com/file/6602b274-b9de-40b4-a567-693a520e958b") && (md5 "/Library/Addigy/ansible/packages/Mozilla Firefox (101.0.1)/MozillaFirefox-101.0.1.pkg" | grep "bc4268b9494cce99fa6780c478df754b") )
cd "/Library/Addigy/ansible/packages/Mozilla Firefox (101.0.1)/"
/usr/sbin/installer -pkg "/Library/Addigy/ansible/packages/Mozilla Firefox (101.0.1)/MozillaFirefox-101.0.1.pkg" -target /If we read this line by line, you'll see the first few lines are all about making sure your directory structure exists, with a series of mkdir calls. Let's call this section "Part 1":
set -e
echo 'Ensuring /Library/Addigy/ansible/ dir exists'
mkdir -p /Library/Addigy/ansible/
echo 'Ensuring /Library/Addigy/ansible/packages/ dir exists'
mkdir -p /Library/Addigy/ansible/packages/
echo "Ensuring /Library/Addigy/ansible/packages/Mozilla Firefox (101.0.1) dir exists"
mkdir -p "/Library/Addigy/ansible/packages/Mozilla Firefox (101.0.1)"Next, we have the most important piece of the puzzle - the md5 command that checks to see if the file we want is present and if now, it creates a secure connection with Addigy and triggers the download. This one-liner is going to be "Part 2":
(md5 "/Library/Addigy/ansible/packages/Mozilla Firefox (101.0.1)/MozillaFirefox-101.0.1.pkg" | grep "bc4268b9494cce99fa6780c478df754b") || /Library/Addigy/lan-cache --md5=bc4268b9494cce99fa6780c478df754b download "https://file-manager-prod.addigy.com/file/6602b274-b9de-40b4-a567-693a520e958b" "/Library/Addigy/ansible/packages/Mozilla Firefox (101.0.1)/MozillaFirefox-101.0.1.pkg" || ( (/Library/Addigy/go-agent download "https://file-manager-prod.addigy.com/file/6602b274-b9de-40b4-a567-693a520e958b" "/Library/Addigy/ansible/packages/Mozilla Firefox (101.0.1)/MozillaFirefox-101.0.1.pkg" || curl -f -H "orgid: $(/Library/Addigy/go-agent agent orgid)" -H "agentid: $(/Library/Addigy/go-agent agent agentid)" -H "auth-token: $(/Library/Addigy/go-agent agent auth_secret_token)" -o "/Library/Addigy/ansible/packages/Mozilla Firefox (101.0.1)/MozillaFirefox-101.0.1.pkg" "https://file-manager-prod.addigy.com/file/6602b274-b9de-40b4-a567-693a520e958b") && (md5 "/Library/Addigy/ansible/packages/Mozilla Firefox (101.0.1)/MozillaFirefox-101.0.1.pkg" | grep "bc4268b9494cce99fa6780c478df754b") )
And at last, we have the simple "Part 3" - a cd command that takes us into the working directory, followed by the call to installer:
cd "/Library/Addigy/ansible/packages/Mozilla Firefox (101.0.1)/"
/usr/sbin/installer -pkg "/Library/Addigy/ansible/packages/Mozilla Firefox (101.0.1)/MozillaFirefox-101.0.1.pkg" -target /With these three pieces, we can now put together any kind of script we want, and copy/paste it into as many Addigy instances as we want. No uploads required.
2 - Example customization - Firefox Patcher
One of the most common things I customize from Addigy's public software is the condition script. The example we'll use today will be my Firefox "patcher". Let's ignore the condition customization and just look at how we'd change the three parts of the above script to fit our needs.
Part 1
The first thing we'll do is change the name of the public software item to our custom software. In this case, I'm changing "Mozilla Firefox (101.0.1)" to "Patcher - Firefox (101.0.1)". By doing a "find and replace" in your text editor of choice, or Addigy's native editor (hit ⌘F to bring it up, then click the chevron on the right to reveal the "Replace" option):

You can do this one at a time (the first button, "b→c" or replace all (the second button, "ab→ac"). Here's the new code:
set -e
echo 'Ensuring /Library/Addigy/ansible/ dir exists'
mkdir -p /Library/Addigy/ansible/
echo 'Ensuring /Library/Addigy/ansible/packages/ dir exists'
mkdir -p /Library/Addigy/ansible/packages/
echo "Ensuring /Library/Addigy/ansible/packages/Patcher - Firefox (101.0.1) dir exists"
mkdir -p "/Library/Addigy/ansible/packages/Patcher - Firefox (101.0.1)"We're ready to move on, now that the script is checking for and creating our working directory.
Part 2
Next, the md5 command. Verify your custom software is operating inside the directory we specified above - if you did a Find and Replace All, your code should now look like this:
(md5 "/Library/Addigy/ansible/packages/Patcher - Firefox (101.0.1)/MozillaFirefox-101.0.1.pkg" | grep "bc4268b9494cce99fa6780c478df754b") || /Library/Addigy/lan-cache --md5=bc4268b9494cce99fa6780c478df754b download "https://file-manager-prod.addigy.com/file/6602b274-b9de-40b4-a567-693a520e958b" "/Library/Addigy/ansible/packages/Patcher - Firefox (101.0.1)/MozillaFirefox-101.0.1.pkg" || ( (/Library/Addigy/go-agent download "https://file-manager-prod.addigy.com/file/6602b274-b9de-40b4-a567-693a520e958b" "/Library/Addigy/ansible/packages/Patcher - Firefox (101.0.1)/MozillaFirefox-101.0.1.pkg" || curl -f -H "orgid: $(/Library/Addigy/go-agent agent orgid)" -H "agentid: $(/Library/Addigy/go-agent agent agentid)" -H "auth-token: $(/Library/Addigy/go-agent agent auth_secret_token)" -o "/Library/Addigy/ansible/packages/Patcher - Firefox (101.0.1)/MozillaFirefox-101.0.1.pkg" "https://file-manager-prod.addigy.com/file/6602b274-b9de-40b4-a567-693a520e958b") && (md5 "/Library/Addigy/ansible/packages/Patcher - Firefox (101.0.1)/MozillaFirefox-101.0.1.pkg" | grep "bc4268b9494cce99fa6780c478df754b") )
Just like part 1, all we've done is change the name of the working directory.
Part 3
Let's wrap up with our final cd and installer commands, again, in the new working directory:
cd "/Library/Addigy/ansible/packages/Patcher - Firefox (101.0.1)/"
/usr/sbin/installer -pkg "/Library/Addigy/ansible/packages/Patcher - Firefox (101.0.1)/MozillaFirefox-101.0.1.pkg" -target /That's it - you've now taken a public software installer pkg and imported it into a piece of custom software. Finish your script and you should be able to copy/paste it into other Addigy instances and it will continue to function.
One very important note - items in the public software library are special, in that they're available to all Addigy instances globally. If you want to do this to your own .pkg files, you'll need to make your software item public (click the Edit button for the custom software, then select Make Public). This can get burdensome, so I'd only recommend it if the package is enormous and updated infrequently - otherwise, just upload the PKG to each of your instances.
For all other purposes, this method will allow you to easily create and update your own custom software and scripts while letting Addigy take care of the .pkg uploads. Not a bad deal.